Hello friends and welcome back I hope you are all having a lovely week wherever you are.
After an ungodly hot and humid weekend, we are now enjoying a spectacular week of cool mornings and beautiful sunny (70's-80's) days...perfect!
So as you know, Sunday is Father's Day and I thought a fabulous dessert recipe would be great to finish off a family BBQ or dinner this weekend.
What man doesn't love
CHOCOLATE
 |
| tore this page from a magazine years ago..Family Circle?? |
Add some Reese's Peanut Butter Cups
and you have an unbeatable combination.
Let's bake Dad a
Peanut Butter Fudge Cake!
This is another semi-homemade, or as we bloggers are fond of saying, a box cake 'restyle'.
What you need:
1 box chocolate fudge cake
1 cup buttermilk
3 eggs
1/2 cup vegetable oil
2 cups chopped reese's peanut butter cups
Do I have to tell you to unwrap them????
Try not to eat too many while doing this.
I failed miserably at this step.
;-<
Try to ignore the aroma of chocolate while chopping.
Hint: if it is warm and chocolate is soft, pop in the fridge to firm them up prior to chopping.
I always line my baking pans with parchment paper and I never have a problem getting my cakes out in one piece.
Spray with non-stick spray or grease with shortening.
 |
| the little bumps you see are tiny chocolate chips that were in the box mix |
Mix with beater on low and then beat at higher speed for about two minutes.
Pour evenly into your two prepared pans
At this point you may use a few of your favorite curse words upon realizing that you forgot to add the chopped peanut butter cups.
Close windows so you don't frighten the neighbors.
Once you have removed the batter..folded in the chopped PB cups and refilled the cake pans,
you will bake at 350 degrees for about 25 minutes.
Monitor during the last 5 minutes so as not to overbake.
I usually tap the cake lightly (it will sound hollow) and can tell if it is cooked through.
This is what your cakes should look like.
Smells so yummy!
Let the layers cool before frosting.
 |
| can I eat it now??? |
This cake has a Ganache frosting.
Don't let that fancy word scare you. Ganache is the easiest thing to make.
All it consists of is heavy whipping cream and chocolate...that's it!
If you have never had Ganache, you are in for a treat.
Bring one cup of whipping cream just to a simmer and pour over 8 ounces of chopped chocolate.
I used really good dark chocolate chips.
Please NO..and I mean NO artificial chocolate!!!!!
I will come after you.
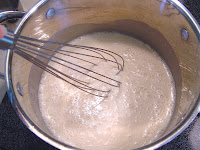
Start whisking
No electric mixer needed
It comes together really fast
Add 1/2 cup good peanut butter and whisk some more
The PB will melt into the chocolate mixture quickly
And that my friends is how to make Ganache!
Wasn't that super easy?
Spread about 1/3 of the ganache on the first layer and top with the second layer.
Looking good!
Pour the ganache over the top layer and let it slowly fall over the sides.
At this point you either smooth the ganache all around the sides or just leave it with the chocolate dripping...it has no effect on the flavor.
I know...I could have neater, but it was 98 degrees and my chocolate was melting...as was I.
I only had chunky peanut butter, hence the bits of peanuts in my ganache.
Pop your cake in the fridge to set and your done!
Be sure to have plenty of milk or coffee on hand.
This cake is so moist and fudgy. It should be illegal!!
I think the buttermilk has a lot to do with it's goodness.
I always decorate with more Reese's Cups on the top of my cake.
The ganache is pure heaven on earth...not as sweet as a sugared icing.
 |
| Don't expect to have any leftovers, if you do , they seem to disappear in the middle of the night. |
I added this last photo so you could really see the chunks of peanut butter cups.
I have made this cake as a sheet cake also with great success.
For a large crowd, I have used 4 boxes for two large rectangular pans.
I spread the ganache on the first layer and simple poured the remaining ganache all over the top.
I didn't worry about covering the sides.
Everyone raves about this cake.
I hope you try it and if you do, come tell me if your family loved it.
To all the Dad's out there
Happy Father's Day!
Now go eat cake!
*
*
Be sure to come back on Friday for my antique Singer sewing table makeover.
Until next time...be kind and stay creative.
Sharing with some great blogs


