Sunday, March 24, 2013

~ Around the shop and an Art Deco restyle ~

Hello friends.....Yes, I know I need to post more often. 
I try...I really do, but as soon as I sit down in the evening with a glass of wine and begin to type, I start yawning!
Seriously.....I am in bed the same hour as most 10 year olds!
I promise to try and do better.
So I thought I would fill you all in on all that is happening at 
The Empty Nest.
New Spring items are arriving and we are busy sewing and painting and restyling the shop.

My son, Sean, was kind enough to indulge his Mom and take a few photos around the shop.
I like this shot...it shows me with one of my favorite things, my sewing machine.

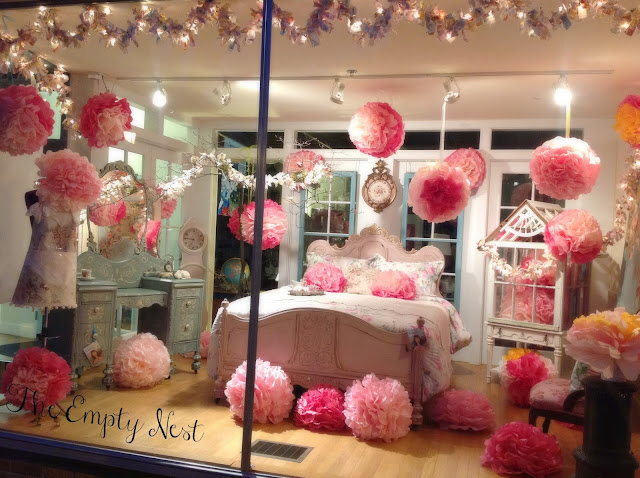
I added a new piece to my Spring window display. This vanity is the matching piece to the beautiful French bed. I decided to paint them in different Chalk Paint® colors. 

Soft Duck Egg Blue and Old White with soft Clear and Dark Wax. Age appropriate distressing and some new bone knobs...Sweet!

I think some lucky young girl needs this in her French bedroom.

So now The Empty Nest window is complete!!
Can you tell Roses and the color PINK was the theme???
I was never really a pink gal, but Annie Sloan's Antoinette Pink has completely turned me around.
I am not ashamed to admit I am head over heals in love.
And ...YES, the bed and vanity are 
For Sale!!

I am very lucky having an assistant like my good friend Cheryl, who is a marvel when it comes to staging. Isn't she pretty?
I need to pin down my other awesome ladies Carol and Sue and get them to pose for me also.

One of the pieces I have been working on is this very sturdy Art Deco dresser with really cool Bakelite handles. In fact I bid on it at an auction just because of the handles!
I put this dresser in the shop and it has sat there for months...I was only asking $110...a steal for a super clean and sturdy dresser.
NO TAKERS!
The solution.......Yes, you guessed it..
Chalk Paint® by decorative paint by Annie Sloan

So after a coat of Old Ochre and some fun Paris Grey/Louis Blue mix stripes, my neglected little dresser is ready to take center stage. 

I had a little fun with the drawer sides. They got the striped treatment also.
Makes opening the drawers a bit more fun.
I also lined the drawers with some thrift store blue and cream stripe wallpaper with the help of my trusty Mod Podge.

I used my Royal Design Studio number stencil to add some typography to the front of the drawers and the bottom cupboard.
Speaking of the bottom cupboard...isn't that unique,
 having the doors at the bottom instead of the top?
I think this makes this the perfect dresser for a child's room. They can keep toys or shoes, that they can easily reach, in the bottom.
And yes...you guessed it, this dresser is no longer $110.00.

 You know I love my porcelain!

These Nippon teacups and saucers are my favorites...so delicate you can see through them!
I have a pretty large collection of Nippon china..beautiful stuff.
They sit on a lovely Emile and Paris Grey wall shelf. These Chalk Paint® colors show off the china beautifully...they don't overwhelm which is very important.

If you follow my blog on a regular basis, you know how I love birds...you will find lots of little feathered friends all around the shop and they are so very affordable. A great inexpensive way to bring Spring into your home.

Aren't these dishes GORGEOUS!!!!!!!
They really look wonderful in my Welsh cupboard.

Isn't this a beautiful piece..love the quarter sewn oak, so special.
Why yes Ma'am...she IS for sale!
Another eagerly anticipated happening is the arrival of Annie Sloan's new book

She is ordered and will be in the shop very soon! All the reviews for Annie's book have been A+.
Before it was even released, it went into second print status!
Once the book arrives in the shop, stay tuned for a fun announcement!

Soon I will be headed to New Orleans for the annual Chalk Paint® Stockist Conference!
We will hang out and learn from Annie herself and share techniques and lot's of laughs.


So that's what is going on at 
The Empty Nest.
Leave me a comment and let me know how all of you are 
and if you are as ready for Spring as I am!
Until next time...be kind and stay creative.
Don't forget to check out AnnieSloanUnfolded.com to find the Stockist closest to you!


Wednesday, March 6, 2013

~ Goodbye Winter...Hello Spring at The Empty Nest ~

Hello friends...
In my mind, I am so ready for 

Gorgeous roses courtesy of Connie at Hartwood Roses blog
This!
But in reality, I woke up to ...

THIS!!!
Oh well...despite all the white stuff still falling very hard, I am busy filling 
The Empty Nest
with lovely Spring treasures.
Come take a look at some of our pretties...

Lovely feather trees and Spring chick bunting will make you smile...many thanks to Cheryl for creating such pretty vignettes...girl, you never disappoint!

I have been happily sewing up some pillows using Annie Sloan's lovely imported fabric. The two pillows on the left are Annie's Faded Roses, Charcoal Pastorale Toile and Monaco Ticking...so pretty.
The pillow in the middle is a combination of Annie Sloan's Charcoal Pastorale and Barry Dixon's Warrenton Toile. I bought a remnant of Warrenton Toile last year and have been saving it for something special. I love how it looks so great with Annie's toile!
The pillow on the right might look familiar to you if you follow Miss Mustard Seed...it is the same fabric as in her living room, but to punch it up a bit, I backed it with a nice green and blue Ikat pattern. All my pillows have down inserts for added plushness. 
Want to create your own pillows...The Empty Nest now stocks down inserts in 3 sizes.
Don't know where to even begin to create an easy pillow...come to my
 Pillows Annie's Way Workshop!
See the schedule above under WORKSHOPS.

My long awaited full Mora clock finally arrived....have I told you how much I love these beautifully shaped clocks??

Love these little elegant trees set in small Mercury glass cups. Great for little tabletop vignettes.

Yes...I am still creating aprons when I get the chance and creating vintage bunting from beautiful hankies.

beautiful Emile Chalk Paint® decorative paint by Annie Sloan on the antique door
My ladies and I have been stringing yards of lovely lighted fabric scrap garland all around the shop. These lighted garlands are so easy to create and give the shop a great festive air.
Carol and Sue, my talented shop assistants worked on a 40 ft long garland for the Spring window display. Thank you ladies!
IT'S FABULOUS!!!!!
Here are a few sneak peak photos of my 'work in progress' 
Spring Display Window

What's the theme you ask....think 
Marie Antoinette
complete with a gorgeous French bed who is sporting her very own gilded crown.

Tattered decoupaged doors

I waxed and distressed her right in the window on a Sunday afternoon...drew lots of attention.

Fabric backed antique windows...roses, roses everywhere

This is how she looks so far..still evolving with more roses, jumbo flowers and a few Mother Nature elements......
You will have to stay tunes for the final reveal.
She is going to be
BEAUTIFUL!!!!!

Interested in learning all about 
painting your world with Chalk Paint® by Annie Sloan?
My March Workshops are posted and there are still a few seats left in selected classes.
To find a Certified and Trained Chalk Paint® Stockist near you
click 

Until next time...be kind and stay creative.


Wednesday, February 6, 2013

~Annie Sloan French Hens simple pillow tutorial~


Hello friends, welcome back to The Empty Nest. Today I am going to show you how to sew up a simple but very sweet French country pillow.
Ok...you can stop that fast breathing, I promise this is going to be so very easy...promise!

If you can sew a straight line, you can make this pillow.
For this tutorial I will be sewing with a design from one of my favorite new Annie Sloan imported fabrics called French Hens.
Doesn't it just sing out French Farmhouse!
The colors blend so beautifully with many of the Chalk Paint® decorative paint colors.

Ok...let's get started.
Supplies needed include:
1. 1/4 -1/2 yard fabric (depends on pillow form size) I used a 14in square down form.
2. matching or coordinating thread
3. scissors
4. 1/2 in cotton twill tape (Joann's Fabric or online)
5. tape measure
6. seam ripper to remove improperly sewn ties (not the I would EVER make That mistake!)

Lay your pillow form on your cut fabric and wrap it around to determine the length needed.
Allow an extra 4-5 in overlap for insert opening.
Mark and cut your fabric.

Turn both short edges under twice to form the hem where they will overlap on the pillow back.
I finger pressed a 1/4 in hem and then turned it up another 1/4 in and pinned in place
Sew the edge seam with either a straight stitch or a zigzag..your choice.
I used off white thread, but you could also choose a decorative color to add a little pizzaz.

Once the two short edge hems are sewn, lay the fabric right side up and place your pillow form inside. Adjust the location of the overlap to suit the fabric design. I wanted to be sure that the placement of my hens was ok. For solid or and all over pattern, this is not so important.

Now pinch the top and bottom layers of fabric together snuggly and pin on both sides as shown above. Be careful NOT to pin the pillow form itself as we will be removing it in the next step.

Ok...so here you have removed the pillow form and laid the fabric flat.

Using a straight stitch, follow the pinned line and sew from top to bottom being sure to backstitch at both ends to secure the corners. For beginners, backstitch simply means to go forward/reverse/forward at the very beginning...it locks the stitches in place so they will not unravel.

For those good at using a serger, you may serge your edges. I am going to assume that beginners do not have a serger, so instead you can set your machine to an overlock stitch and sew right up against your straight line..then clip off the excess fabric.
The above photo shows my straight stitch on the left and my overlock stitch butted right up on it's right. This step will reduce fraying. To make it even easier..just run a little Fray-Check along the edge instead of overlocking. See, I told you I was going to make this easy and painless!

Now turn the fabric right side out, pushing the corners out to create the points. Press seams if needed.

Cut four lengths of the cotton twill tape for the pillow ties. I cut about a 17in length for each..it will depend how long you want your ties on the bows. Always cut on the long side..better too long than too short as you can always trim them later.
Pin the ties so they are centered along the edge.
As shown in the above photo, turn the tape end under about 1/2 in with the tie running away from the fabric. Stitch in place with straight or zigzag stitch..back and forth a few times to secure.

After I secured one side, I marked where the opposite ties should be placed.
If you are slightly off..trust me, it will not make a difference..remember, you are having fun..right?

I leave the room for two minutes and someone has sewn the ties on the left in the WRONG direction...SHEESH! Who could have done that????
And this is where the seam ripper will come in handy!

Pay no attention to the ties on the left which are STILL going in the wrong direction....they will be fixed.
Now insert your pillow form into the pillow and tuck the pillow corners into position..fluff up the pillow and tie the ties into pretty bows.
Your are done!

Without pipping..ruffles..zippers..buttons or fancy embellishments, you have created a beautiful French country pillow.

What do you think....pretty easy wasn't it?

Don't even own a sewing machine...no problem. You could easily hand sew this design using just a needle and thread...no problem and no excuse!
A great thing about this simple pillow design is that you can create multiple covers and switch them out for the different seasons. Maybe instead of cotton twill ties, use pretty grosgrain ribbon or braided twine. Change your decor...no problem. Pop out the pillow form and sew up another cover!

Well thanks so much for visiting and I hope you are inspired to make a few wonderful custom pillows for your home or for gifts. 
The possibilities are endless..get creative. 
If you like Annie Sloan's lovely French Hens, you should see her other beautiful French imported fabric line. Stop by The Empty Nest and I will be happy to show you Annie's gorgeous toiles, florals and tickings.
To find an Annie Sloan fabric retailer near you go to anniesloanunfolded.com and type in your zip code.
Now get out that sewing machine and have some fabric fun!
Until next time...be kind and stay creative.