

Wednesday, March 31, 2010
Monday, March 29, 2010
Tutorial Tuesday With Hope Studios


Hello friends...it's Tuesday again and that means we all get to learn how to do stuff! Lot's of stuff.
This week I am going to show you how to create a lovely pedestal cake plate using Salvation Army antique/vintage plates and glass candlesticks.

For this DIY you will need a pretty vintage plate or any plate for that matter, a glass or crystal candlestick and a tube of Liquid Nails.
Notice the $.99 price tag on my plate..plus another 25% discount because it was discount Wednesday..so $.75...not bad huh? The two glass candlesticks were $.50. each. How can you not LOVE the Salvation Army?????

Isn't this a lovely design? This plate was priced at almost $20.00 on Replacements, Ltd.

Open the Liquid Nails and place small dots all along the surface of the stick that you want to adhere to your plate. Less is always better than more when gluing anything.


Locate the center of the bottom of your plate..I marked mine with a piece of masking tape but it is not hard to just eyeball it. Place the two pieces together and then carefully pull them apart and wait about 5 minutes before reattaching. Placing it on and off like that is supposed to make for better adhesion.

Any excess can be wiped off pretty easily and you have some time to play with it before it dries completely. I would allow a full 24 hrs for drying and curing.

Isn't it beautiful?
I think this would make a lovely Mother's day gift or Bridal shower gift. It is so inexpensive it would make a great "I'm glad you are my friend" gift!

While I was waiting for my dining room walls to dry(that's a whole makeover post coming soon) I created a few more pedestal servers. All Salvation Army finds.


So that's it..the possibilities are endless and I hope you learned something new and that you think twice before you toss that old plate away...;-)
Thanks to Jennifer at Hope Studios for hosting Tutorial Tuesday and to Everything Etsy..be sure to click on their buttons at the top. Be sure to check out all the fabulous tutorials over on their sites.
Until next time...be kind and stay creative.
Housing Market is Up
Just a little something to make you smile on this Monday morning.

Remember my little Carolina Wren who has been sleeping in my garage all winter?

Well she and her husband have begun to set up housekeeping in a bookshelf next to her sleeping quarters.
This was taken last week and now the nest looks like a two bedroom condo...very elaborate. I've read that the male builds a few nests and the female chooses which one she likes best...how considerate. Don't worry..I have since removed the pruning paint can from that shelf. I don't want them living next to a toxic waste area...;-)Until next time...be kind and stay creative.
PS...be sure to pop in on Tuesday for Tutorial Tuesday...come learn something cool.
Sunday, March 28, 2010

Thursday, March 25, 2010
Friday is Pieday!


I make quiche quite often and never use a printed recipe, so I tried my best to recreate my recipe and write it down for this post. With the exception of the liquid, cheese and the eggs, feel free to make optional most other ingredients. By that I mean you can omit mushrooms if you don't care for them or change the sausage for bacon or chopped ham...things like that. When I make quiche, whatever I have in the fridge..goes in the quiche, so get creative.
Ingredients for 2 pies:
1. 8 eggs (can use egg-beaters)
2. 3 cups fat free half and half ( can use milk)
3. 1 cup cottage cheese
4. 1/2 cup chopped mushrooms
5. 1/2 cup chopped onion
6. 1/2 cup chopped celery (I almost forget this!)
7. 1 small can chopped green chiles
8. 1 large bag shredded sharp cheddar (4 cups)
9. 1 package sausage(can be made meatless) about 1 pound
10. fresh cilantro chopped and some whole for garnish
11. 1 package frozen pie crust (2 per pack) do not thaw
12. 4 potatoes ( I used yukon gold, any but idaho will do)
12. 4 potatoes ( I used yukon gold, any but idaho will do)

Peel and boil potatoes until cooked through. Remove from water and slice..set aside.


In a large skillet, brown meat and half way through add onion, celery and mushroom. Saute until meat is cooked and veggies tender. Season with salt and fresh ground pepper to taste. If you have a favorite herb or spice..add it! Strain out any excess fat and set aside.


I know your smiling now...you don't have to make pie crust! Although many times I will use frozen pie crust, I thought it was important for you to know how to make your own. But I'm hear to say that if you buy a good brand like Marie Callenders or Mrs. Smith, the results will be wonderful. They are a staple in my freezer and I stock up when they are on sale.


In each pie pan, place about 1 cup cheese in the bottom and layer potato slices on top. Sprinkle with the chilies and some chopped cilantro. Divide meat mixture between the pies.


In a large bowl whisk together eggs, half & half and cottage cheese. I love my handheld blender for this job. Place the rest of the cheese evenly over both pies. Place the pie on your oven rack and this is where you are going to pour the egg mixture into both shells. It is much easier to fill the crusts in the oven than on the counter and then have to do a balancing act to the oven. I have learned this the hard way ;-(

Pour slowly and evenly and all the way to the top of each pie. bake in a 375 degree oven for about 50-60 minutes or until golden and set. Cover loosely with foil if browning to quickly. I always lay a sheet of foil on the bottom rack to catch any overflow anytime I bake.

Your quiche should look like this when ready to come out of the oven..all golden and cheesy.


Doesn't that look delicious..all moist with cheese and potato and sausage..Yum! This makes a great dinner if served with some sliced tomatoes and cilantro garnish or fresh fruit and maybe a dinner salad on the side. My boys always loved this dish because they knew their would be the extra pie for breakfast the next morning. It reheats great in the microwave. Heck..I love eating it cold the next day. It's all good.

So there you have it...my version of sausage and potato quiche. I hope I did not forget anything..as I said at the start..I never measure when I make it. So this is good, as I now have it written down for my guys to cook in their kitchens.
Until next time..be kind and stay creative.
Wednesday, March 24, 2010
Wordless (kinda) Wednesday

Photo of my front/side yard taken from my upstairs bathroom window. Storm was moving through to the left and sun was setting to the right. I love the juxtaposition of the light and dark. Scenes like this make me smile...I'm a simple gal ;-
Monday, March 22, 2010
Tutorial Tuesday With Hope Studios
Happy Tuesday friends. Today I am joining Jennifer over at Hope Studios, for her Tutorial Tuesday Linky Party.


I already do a Pie tutorial, so I won't bore you with a pie. I do however make a mean Mashed Cauliflower & Broccoli Casserole. Sometimes my hubby and I skip the meat and just eat this for dinner. He even loves it cold for lunch. So here we go!

Start with some lovely fresh veggies..I make a lot because it is just as easy to do that and have leftovers.


Wash the veggies, break them into florets and place in a large pot with half pot of water. Bring to a boil and cook until just tender. Do not over boil as you will be baking them also. Just soft enough to mash.

Drain and mash with big dollop of mayonnaise, 1/2 stick of butter, 1/2 cup grated parmesan cheese, 1/2 cup shredded cheddar cheese and salt & pepper to taste. I have substituted lowfat mayo and butters like Smart Balance with good results. If you are making a double batch, just increase the mixins accordingly. Really no wrong way to do this.

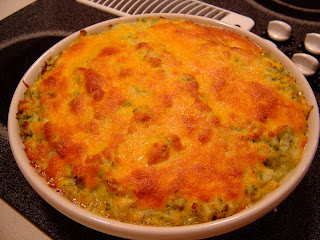
Place in sprayed (Pam) or buttered casserole dish and sprinkle with shredded cheddar cheese. Bake at 350 degrees until golden and bubbly and you just can't stand it any longer.

You will never have a problem getting your kids to eat their veggies again. This is so good and takes hardly anytime at all. Oh my gosh.....now I'm hungry! Enjoy and I hope I 'tuted' you properly ;-)
Until next time...be kind and stay creative.
Lovely Way to Start My Week
Hello friends...I woke up this morning to a gentle rain outside and good hot Colombian coffee waiting in the pot. Could the day get any better.....YES, it could. I opened my Etsy shop to find that yesterday a beautiful Treasury posted by a fellow Etsian had made the front page and she included one of my clutches! The shop is called Magillie and it turns out she lives in my town...small world huh? Magillie creates gorgeous jewelry and you should take a stroll through her shop here. I really love the Big Sky earrings


Aren't these colors so pretty?

So a huge THANK YOU to my friend Magillie for including my spring clutch in her Treasury and congratulations to her for making the front page. Girl, we really need to meet!!!
Until next time..be kind and stay creative.
PS....I have something I am working on in my home and I plan to blog about the before and after..so stay tuned ;-)
Thursday, March 18, 2010
Friday is Pieday!!


Ok..for our Raspberry Pie you will need :
1. 6-8 cups of frozen or fresh raspberries (depending on pie pan size)
2. 1 cup granulated sugar
3. 4 Tbl cornstarch or 3 Tbl tapioca either work fine. If using all frozen berries, increase by 1 Tbl
4. 1 Tbl orange juice
5. 2 Tbl raspberry powder gelatin (boost color & flavor) optional
6. 1 egg white slightly beaten( to brush on crust)

I used a mix of fresh and frozen for my pie (all fresh would break the bank..not in season yet)

Prepare your pie crust and divide into two balls, one slightly larger than the other. The larger one goes on the top of the pie. Mix the berries, sugar, cornstarch and juice in a large bowl. Ok ..I have to confess, I was so enthralled with an Eastern Bluebird right outside my kitchen window (starting a nest in my birdbox) that I forgot to take a picture of the fruit mixture. So close your eyes and imagine a bowl of berries, sugar and juice all mixed together...now open your eyes and read on.

With the leftover pie dough, cut out little shapes..I made stars. After dotting the berries with dabs of butter, roll the top crust over your pie..tuck and crimp. Make a few slits for steam release and using the egg white, brush the top and edges of the pie. Brush some egg white on the back of the stars to adhere them to the crust and sprinkle the top with sugar.

Bake in a 425 degree oven for 15 minutes then reduce temp to 375 and bake about 25 more minutes or until golden and bubbly. Cover edges if needed to prevent over browning.

Here she is all golden and flakey.


I told you that vanilla ice cream would come in handy...go get it...now..I'll wait for you.

You came back just in time..I was just about to dig in and yes ..this is what I had for breakfast. Hey..the piece was cut and I had to do something with it! I hope you give Raspberry Pie a place at your dessert table this summer. As a health note..I have used Splenda in my fruit pies and had excellent results, so those of you with sugar concerns..you can have pie too!
Until next time..be kind and stay creative and eat pie! Next week is a great savory pie, so come back.
Subscribe to:
Posts (Atom)