
Hello friends....thanks so much for visiting again.
Today I am going to walk you through the creative process of
painting a beautiful canvas floorcloth.


For those of you who have followed my blog from the beginning, you might remember the
Nautical Compass Rose
floorcloth tutorial I did.

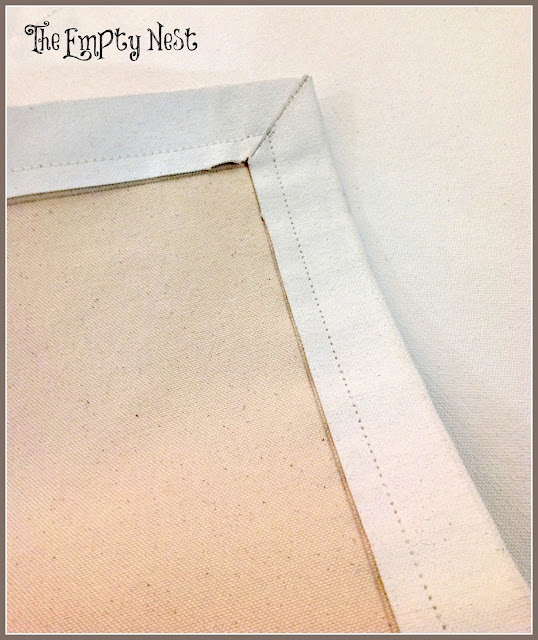
My canvas of choice is from Canvasworks Floorcloths by Lisa Curry Mair, who I consider one of the most talented floorcloth artists in the nation.
 |
| read about this HERE |
Now THAT'S a floorcloth!!!
This talented lady really is a master at this artform.

Lisa uses very heavy weight canvas that has a stitched hem and is preprimed.
The corners are beautifully mitered and these floorcloths lie very flat on your floor.

My stencils of choice are the beautiful designs of
Melanie Royals and Royal Design Studio.
For this floorcloth I picked out the very pretty
Indian Floral
#3032

The quality of the mylar they use is unbeatable and results in a sturdy yet pliable stencil that will not stretch out of shape as many lesser quality ones tend to do.

I began by basecoating my floorcloth with Chalk Paint® decorative paint in Duck Egg Blue.

Since the primed canvas has a texture to it, I used a circular stroke to work the paint into the fabric. Then followed up with nice even strokes for full coverage.

The Chalk Paint® dried very fast. You can see the paint drying on the right and wet on the left.

Once good and dry, I flipped the floorcloth over and painted the edge and the underside hem.
To keep the underside neat, I place an index card under the edge while painting.
This will give you a nice clean look to the edge of your floorcloth and help to stabilize the stitching.

Indian Floral is a very large design and it happened to be the EXACT width of my canvas from stitching to stitching. I had a couple of inches side to side that I knew I could fill in with the flowers.
I taped the stencil to the floorcloth and now the fun begins!

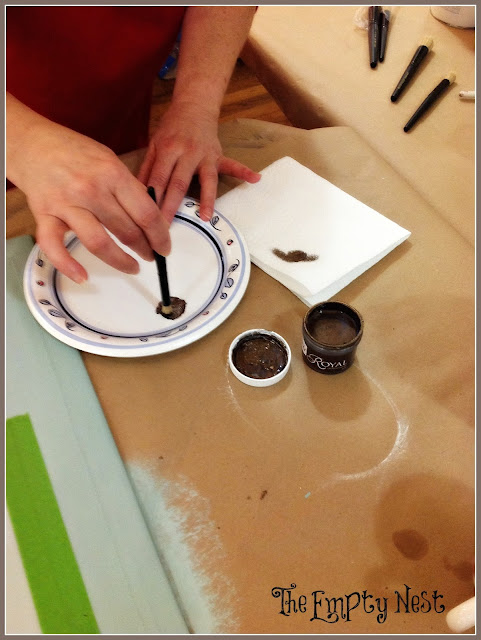
For the vines I used Royal Design Studios creamy Stencil Cremes in Bronze Age. It was the perfect brown with just a touch of gorgeous shimmer.
These cremes go on super smooth and dry almost instantly.

Using a Royal Design stencil brush, I picked up a tiny bit of creme and swirled by brush on a paper plate to work the creme in. Then I off loaded or in layman terms..removed all excess color.
The idea is to have just enough color on the brush to
without having excess creep under you stencil.
You goal is to achieve a clean, crisp edge.
MY VERY FIRST BLOG VIDEO!!!
Here is a quick video showing me stenciling the vines.
Notice I am applying the creme in a circular motion and with a light touch. I intentionally let a little of the vine color hit the leaf stem, since stems do tend to be brown.
As I go I am holding down the stencil, however often times I will use a quick spray of repositional adhesive to hold the stencil in place.
Whatever is more comfortable for you.

MY SECOND BLOG VIDEO!!!!
I feel like a highfalutin video expert now!
Once the vines were complete, I started on the leaves using Versailles Chalk Paint®...again in a circular pattern and with a light touch. Every now and then carefully untape and lift up one side of the stencil to see how it is all coming along. Don't worry about the one dimensional look at this point because we will be adding some dimension in just a bit.

One of my favorite things about stenciling is the shading and highlighting you can achieve.
You can have a sweet one dimensional design or with just a few extra well placed brush strokes, you can have a lovely multidimensional effect.
To achieve this in my stenciling, I first applied Scandinavian Pink to the whole flower, then shaded the inside petal with Emperors Silk and added a touch of Old White to the flower tips.
The center was first done with Arles, then shaded on one side with a little of the Bronze Creme and finally highlighted on the opposite side with Old White.
I used the very same technique on the leaves....based in Versailles, shaded with Bronze Age creme on one side and highlighted with Old White on the other side.
Please let me repeat...all this is taking me literally minutes to do. Both the Chalk Paint® and the Stencil cremes are so fast drying that I can work very quickly all around the surface without fear of the paints smudging.

Once all your stencil work is complete, you will need to remove ALL residue from the surface of the floorcloth prior to applying the Lacquer.
You can use a lint roller of just roll a piece of wide tape as I did here.
See all those tiny flecks stuck on the tape?
Those would all get stuck in your protective finish and that would not be pretty.

After I let my painted surface sit overnight, I applied the final top coat.
Since I was using Chalk Paint®, I am choosing to use Annie Sloan's Floor Lacquer.
This is a very efficient water based and matte finish product that will provide maximum protection and durability for my painted floorcloth.
I shook my container very well to make sure it was completely mixed, then poured a little onto a paper plate.
Using a sponge roller and starting from top left to top right, I began rolling on a very thin coat of Lacquer. It went on very quickly and very smoothly.

Here you can see the application on the left...love how it brings out the depth of color and adds a very pretty finish.

Once dry, I rolled on two more very thin coats, letting them dry really well in between. Thin coats is the key for a beautiful even finish and proper drying time.
See how the shading really takes my floorcloth to a new level of beauty.
You will be amazed at how easy this look is to achieve with Chalk Paint®
Most importantly, don't forget to sign and date your artwork!
 |
| Hello Spring! |
Now my painted floorcloth is ready for her audience...Well actually she is already sold!
Always place your floorcloth cloth on a clean, hard surface, NEVER a carpeted area. Use double side carpet tape or poster adhesive to secure the floorcloth to the floor
Depending on usage and wear and tear, your may relacquer your cloth after a year or two if needed. Clean with damp mop.
Should you need to move or store your rug, always roll it up painted side facing outward.
Never force a once rolled up floorcloth to flatten out onto a floor as this may cause cracking. Carefully open the rug and place it gently on the floor, letting it slowly flatten and relax on it's own.
I hope you have learned a few new things about painting a canvas floorcloth and feel confident to try it.
I promise you will enjoy the process and love the feeling of pride when someone asks...
"Did you paint this?" and you reply...
"Why YES...I did"
Until next time...be kind and stay creative!
PS...for more information on Stenciling and Floorcloths check out
and
To find a Chalk Paint® Retailer near you check out


