
Hello friends...welcome back!
So happy you guys enjoyed my last photo post. I love taking pictures of the beauty around me and sharing it with you. I had a few questions about what kind of camera I use.
 |
| click to enlarge |
My photos are taken with a simple point and shoot. I use a Sony Cyber Shot G with 10x optical zoom. Any editing I do is with Picnik. I have a Photoshop program, but it is too confusing for my little brain ;-<
I got an e-mail from Christiana, a nice lady in Poland, who wanted to know about my couture aprons.
she sews and was interested in how get the couture look she had seen in my creations.
Well I'm all about sharing, so I thought you might like to watch me create an apron. Could I keep my secrets and just sell her one...sure, but that would be a little self centered and selfish if you ask me.
Life is too short not to share with others.

So let's start with a trip to the Salvation Macy's thrift store. I found this denim print maxi skirt from Talbot's with the store tags still attached. Original price was $58.00 and it was marked $5.99. It was Wednesday and what happens on Wednesdays?????
That's right..25% off EVERYTHING!!
SOLD for $4.50..not bad.

After washing it, I used a seam ripper to open up the entire back seam.

I then cut off enough fabric to make my apron 18 inches long.

I removed a few more stitches at the waistband to give me room to turn under about 1/4 inch of the ends and sewed them down.

I turned up all edges 1/4 and then 1/4 again and pinned in place.

When I got to the waistband, I refolded as it was originally..before I removed those few stitches. Carefully tucking the new edge inside the waistband.


Now the 'couture' fun begins. Look around your studio or craft room (aka. kitchen or dining room)
Now is the time to use those cool fabric scraps, vintage buttons, linens or appliques that you have been stashing. Admit it...we all stash!
I found these super cute and very old quilt squares at a local antiques mall for only $1.50 each. They are lightly age stained, a little shredded and just gorgeous.

I cut one square into 4 triangles with rotary pinking scissor. For you ladies with a keen eye, no, I do not use a rotary cutter one handed, but have you ever held the guide ruler with one hand, rotary tool in the other AND took a photo of yourself doing all this???
Not so easy. Hence..staged photo. Yeah...it's a phony...I'm not cutting a darn thing here ;->

If you don't have an old quilt square..no worries. Some beautiful fabric or old linen triangles would be great also. I used a product called Lapel Stick and it is AWESOME! It looks like a giant Chapstick, but it is a gentle fabric adhesive. It held my quilt pieces in place while I sewed them..no pinning! I got mine at KellyAnn's Quilt Shop, in Warrenton, Va.

I used a running zig-zag stitch here to blend in with the pinked edge.


Add more embellishments...I had the delicate matching cotton lace placemat from my French apron and decided it would be a nice compliment to the hearty denim. Opposites do attract you know!

Digging deeper into my stash, I found a scrap of vintage peach chenille.
Nice textural interest at the waist.
Remember.with couture aprons, it's all about visual interest. Different textures, silky paired with rough. Give the eye a plethora (I like to use that word at least once a week) of visual candy.
Remember...this is not a BBQ apron (find awesome ones here) or one made for heavy kitchen duty.
Don't be afraid to sew outside the box.

Now look at the components of your apron and find some complimentary fabric for the ties.
Because of the denim and the quilting, I chose an old fashioned patchwork cotton.
I like full, lush bows so I cut my fabric 8 1/2 inches wide and at least 36 inches long.

Fold the strips in half lengthwise and with a 1/2 inch seam, you will have a 4 inch wide tie.
To create the point on your tie, sew on a diagonal from the left corner down to the right side of the tie.

Then sew all along the length. Leave the bottom edge open for turning right side out.

Trim excess fabric off the top edge.

Turn right side out and press flat.

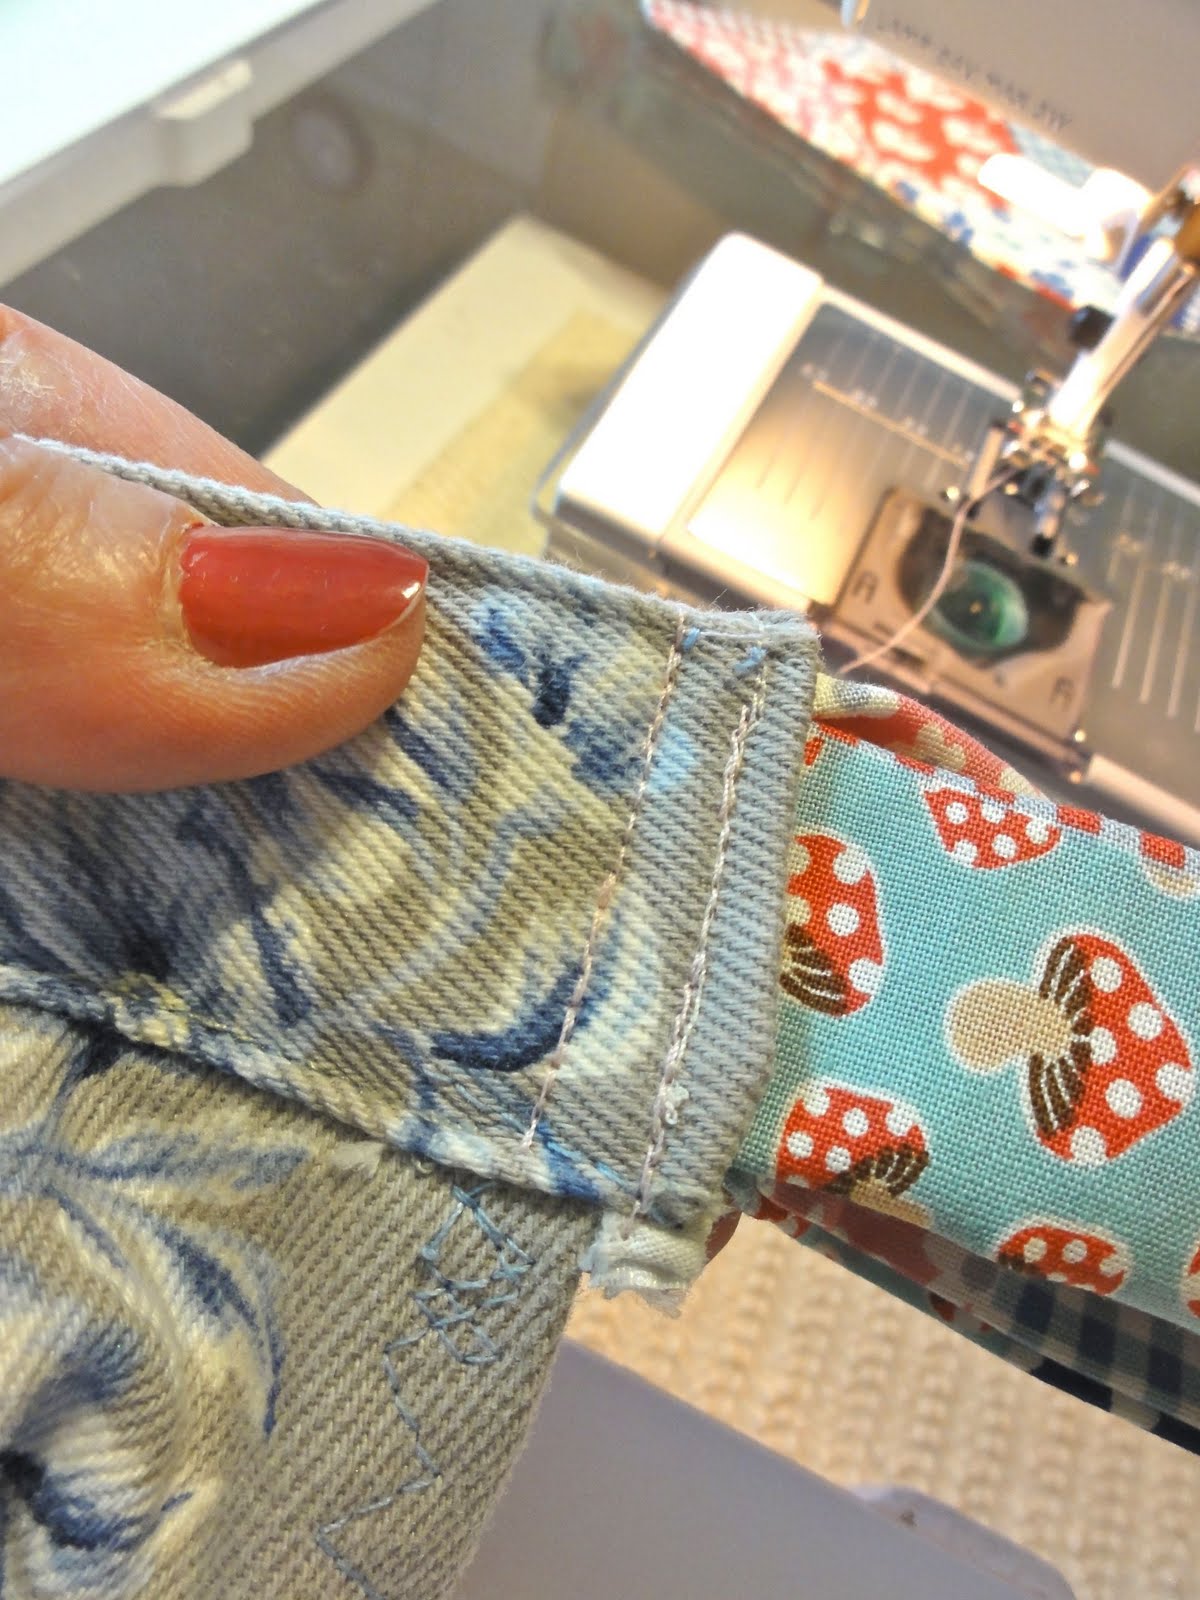
Fold the open end of your tie over onto itself as shown. Any fold will do, as long as you can fit it into the waistband opening. (See picture #6)

Remember I told you not to sew the waistband edge closed...this is why.

Once both ties are pinned, sew in place.
HINT: I am sewing on multiple layers of denim and used a denim needle. Be sure to change your needle often and use the correct needle for each job. Often it's these things that cause your machine to not operate properly and it's an easy fix.
Sew two rows of stitches for strength.

Don't forget to sew in your label so you get all the credit.
That's it!
*
*
*
*

Here she is ...a truly couture apron.

Isn't she pretty?

Do you see what I mean about the juxtaposition of the feminine lace work against the sturdy denim and the shabby chic quilt pieces?
Your eye has so many places top land.

The bow adds a little more country charm.


Be gorgeous even as you walk away!


The peach chenille gives the apron a nice pop of color.


By using a skirt, I saved so much time as the pockets were already there!

I bet you will never look at a skirt in the same way again.
Now find a thrift shop, bring home a skirt and have some fun creating your own Couture apron.
Who knows....you just might find yourself on the pages of a magazine
;->
I'll be sharing my tutorial with these lovely blogs: